
This is the second installment of instructions for using your new True Cuts Strips and Shapes rulers. Last time I showed you how these magical rulers help you cut a whole bunch of shapes with just a few swipes of the rotary cutter. These rulers are truly a game-changer for simplifying and speeding up the rotary cutting process for quilters.
<<read the tutorial on cutting strips, squares, and rectangles here>>
We've also added a video tutorial so you can watch demonstrations on using these rulers for your everyday quilting needs.
<<watch video demonstration here>>
Today, we are going to look at cutting angled shapes with the True Cuts rulers. Be sure and read the previous tutorial to learn the basics. We will build on those to add more shapes to our cutting repertoire, including 45 degree angles, quickly cutting multiple squares into half-square triangles, and strips into diamonds. Let's get to it!
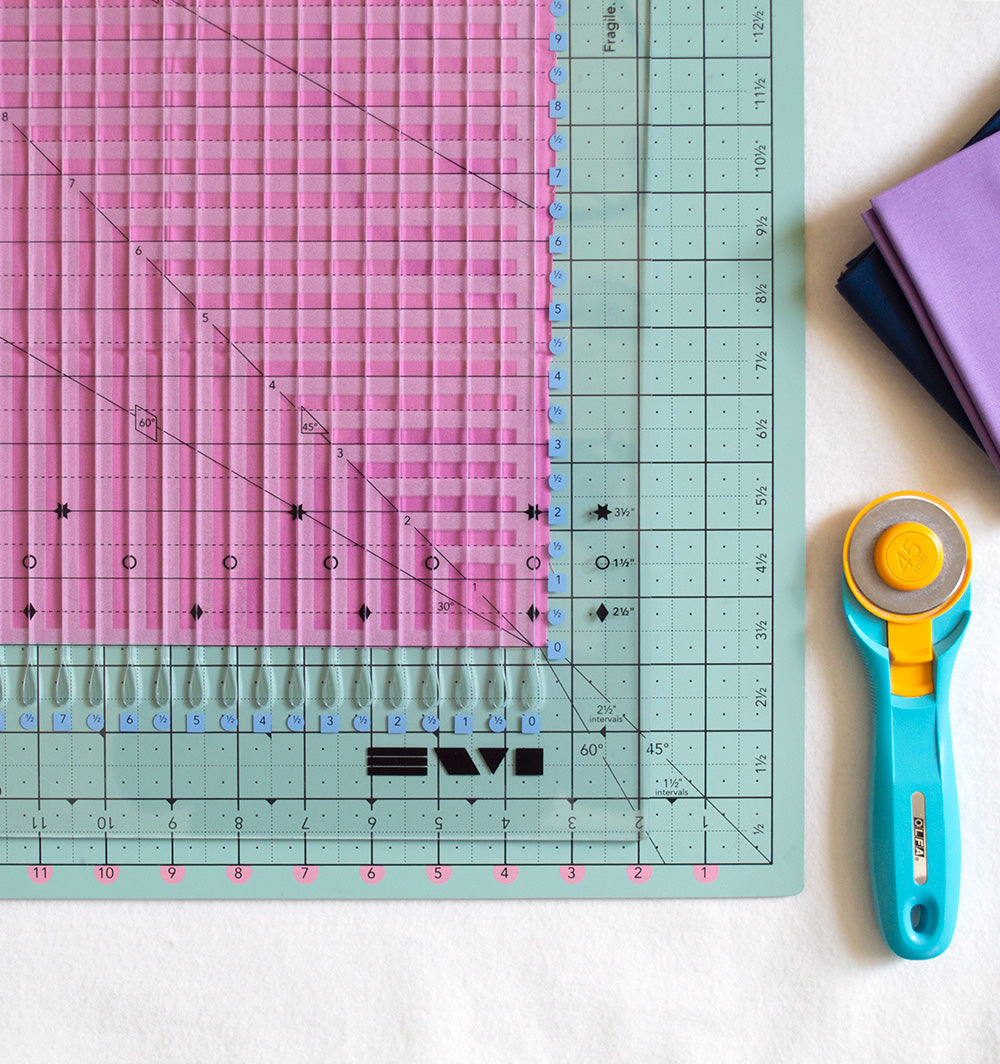
How to cut 60 degree diamonds and triangles:
1. Use the basic True Cuts Ruler tutorial to cut fabric into strips the desired width of the diamonds. For this example, I have cut strips 3 1/2" wide.
2. Position the strip on the cutting mat so that it is angled downward, with the lowest end to your right hand side.

3. Place True Cuts ruler over the fabric strip. Adjust ruler as needed so that one long edge of the fabric strip is aligned with the 60 degree line. (in photo above, note that the top edge of the strip aligns with the 60 degree line). The '0' cutting groove should pass through the bottom edge of the strip at the corner.
4. First Cut: secure the ruler with your non-dominant hand. Hold rotary cutter in dominant hand. Insert rotary cutter in cutting groove '0' and cut through fabric. DO NOT MOVE RULER OR FABRIC.

5. Second Cut: move to the left from the '0' marking to the number corresponding to the desired width of diamonds you want to cut. Use the cutting grooves to cut at desired increments for as many diamonds as you want. (for my example, I am cutting 3 1/2" diamonds, so I will use the grooves at 3 1/2", 7", 10 1/2", and so forth).
6. Move ruler and set aside. Voila! diamonds. Set cut pieces aside and reposition remaining length of fabric and ruler as in steps 2-3. Continue cutting at desired increments to make as many diamonds as you need.

How to Cut Half Square Triangles:
1. Use the basic True Cuts ruler tutorial to cut squares in size required for quilt pattern.
2. Position squares on the cutting mat in an "on-point" position. It's helpful to use the lines on your cutting mat to line up the squares at this step. Place squares so that two opposite corners align with the same vertical line on the cutting mat.

3. Place the True Cuts ruler on the fabric. Adjust as needed so that cutting grooves pass through the squares corner to corner. If you've lined the corners of the squares with lines on your cutting mat, you can use the same lines to align with cutting grooves of your ruler.
4. Cut through each groove that passes through a row of squares as shown in photo above.
5. OPTION (shown below) for cutting triangles from a single large fabric square: fold the square in half, matching up two opposite corners. Place the resulting triangle shape on the cutting mat with the fold aligned with a horizontal line on the cutting mat.
Position True Cuts ruler with the horizontal '0' line on the fold of the fabric and a cutting groove passing through the point at the top of the folded square. Cut through this groove to make two half-square triangles.

6. OPTION for cutting bias strips: Position the fabric as described in step 5 and shown above. Instead of making one cut at the center of the fabric, cut strips using cutting grooves at desired increments.
For example, to cut 2 1/2" wide strips: position fabric triangle with fold aligned with the horizontal '0' line and the right hand point of the triangle at the '0' point of the ruler. Cut the grooves at 2 1/2", 5", 7 1/2" and so forth. The medium size ruler can cut up to 5 (2 1/2") strips without repositioning. The largest ruler can cut 7 (2 1/2") strips without repositioning. The number of bias strips is dependent on the size of fabric square you start with and the width you choose to cut.

The concept shown above for cutting 60 degree angles can be applied to cutting 45 angles on your binding strips, for mitered ends on border fabrics, or for setting triangles. Align fabric strip with the 45 degree line instead of the 60 degree line on the ruler.
Once you understand and practice these basic techniques to cut strips, squares, rectangles and angles as described here and the previous tutorial, the possibilities grow and grow! What will be YOUR favorite use for the True Cuts Strips and Shapes rulers?
To see all of these techniques in action, watch our video demonstration.
<<Get your True Cuts rulers here>>
Enjoy!
-Sharon

2 comments
Helen
Great tutorial
Barbara Moore
I ordered or thought I did a true cut ruler but received a regular ruler with no cutting slots in it?..
Leave a comment
This site is protected by hCaptcha and the hCaptcha Privacy Policy and Terms of Service apply.