Rotary cutters are super handy tools that allow you to cut large sections of fabric quickly and accurately. They’re especially useful in projects like quilting, where you want to create a variety of identical squares of fabric. However, there are so many different types of rotary cutters. How do you know which one is best? A rotary cutter is also a sharp tool, and if used incorrectly, it can damage your fabric or even lead to injury.
In this guide, we’ll go over everything you need to know about rotary cutter usage, safety, purchasing, storage, and more.
What Is A Rotary Cutter?
If you’ve never heard of a rotary cutter, they’re handy little tools used to cut large swaths of fabric easily. They’re composed of a round blade attached to some sort of handle for control. They’re somewhat similar to a pizza cutter (although we wouldn’t recommend using your pizza cutter for fabric, or vice versa!)
Rotary cutters come in a wide variety of styles, handle sizes, and shapes. Rotary cutters are categorized by their blade size. The sizes that are regularly available are 18mm, 28mm, 45mm, and 60mm. 45mm is the most common size, but you’ll see 60mm quite a bit as well.
For most projects, a 45mm blade works perfectly. If you’re working on a larger project with thick fabrics, go for a 60mm blade. Generally, smaller blades are better for curves and corners, and larger blades cut through greater quantities of fabric at once. If you’re cutting detailed bits like appliques, an 18mm or 28mm blade will do the trick.
Why Use A Rotary Cutter?
You may be wondering: “Why should I invest in a rotary cutter when my scissors work perfectly fine?” In short, rotary cutters make cutting fabric faster and easier, and they cut more accurately. Rotary cutters have a razor-sharp blade that can precisely cut through multiple layers of fabric at once. For quilters and garment makers, this saves valuable time, allowing you to spend more energy on the fun, creative parts of the process.
Another amazing thing about rotary cutters is that they have easily replaceable blades. You can purchase large packs of blades relatively inexpensively, so you can keep your blade sharp and cutting smoothly. With scissors, once the blades are worn out, they’re much more difficult to sharpen or replace.
Rotary cutters also have no difference for right-handed users vs. left-handed users. You can easily switch back and forth between whatever is most comfortable. Rotary cutters are easy to use, and with a tiny bit of pressure, they’ll slice through layers of fabric with ease.
The main benefit of rotary cutters is how precise they are. Scissors often result in wobbly, curved lines, while rotary cutters offer straight, clean, precise cuts every single time. They’re essential for professional-looking results of quilting projects and other garments. Once you try a rotary cutter, we promise you’ll be converted forever.
Rotary Cutter Safety
While rotary cutters are an amazing, helpful tool, when used incorrectly, they can lead to injury. It’s important to always use your rotary cutter as directed and with care. Before use, you should familiarize yourself with general sharp blade safety. Rotary cutter injuries can be extremely painful and dangerous, so follow the tips below to avoid them.
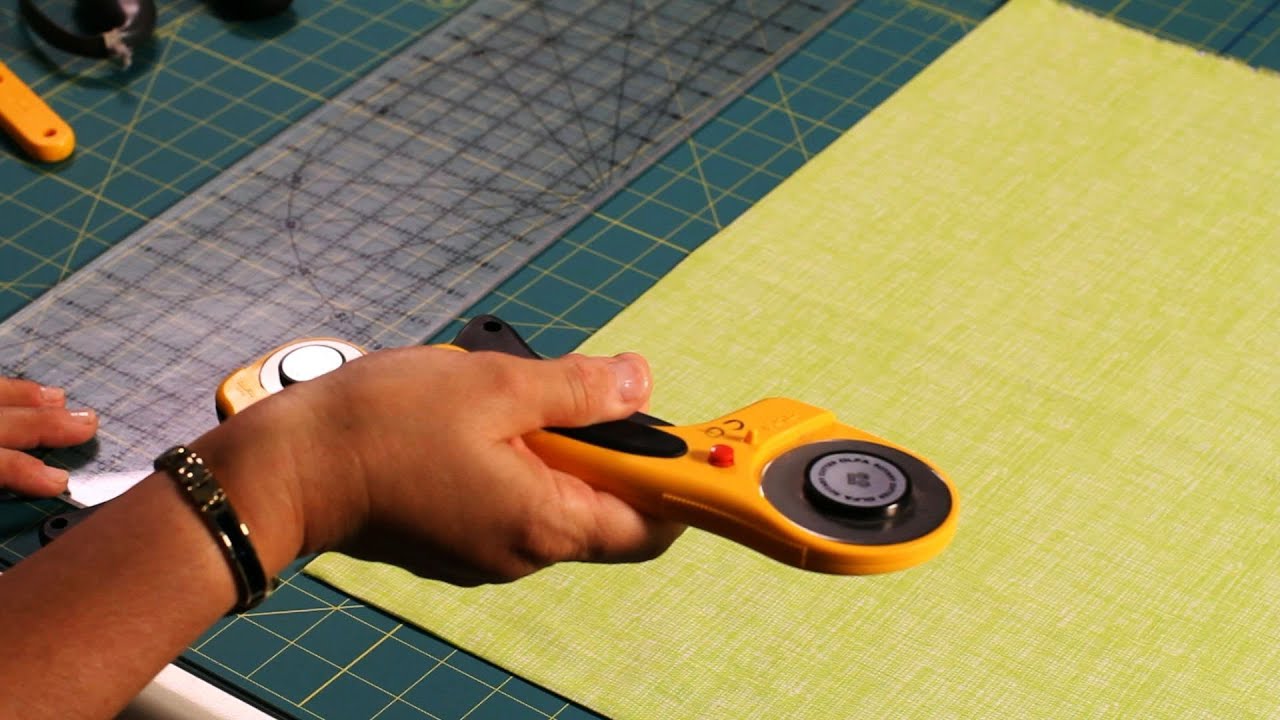
- Use A Ruler: When cutting with a rotary cutter, it’s important that you give yourself a barrier between the blade of the cutter and your fingers. This is best done with a large ruler with a straight edge. Not only does this protect your fingers, but it also ensures that you’re cutting in a straight line.
- Close The Safety: Whenever you aren’t using your rotary cutter, make sure to close the safety. This is especially important if you have little kids in the house, as inappropriate sharp storage can often lead to injury. Keep your curious little ones safe, and always close the safety.
- Keep Your Blade Sharp: Did you know many knife injuries are often caused by dull blades? Although this seems counterintuitive, when a blade is dull, you often need to apply more pressure to cut through the material. Avoid injury by replacing the blade of your rotary cutter often.
- Discard Blades Safely: After you replace the blade of your rotary cutter, it’s important to dispose of the blade properly. Tossing it in the trash uncovered is bound to lead to an accident. We recommend covering the blade with thick tape before you toss it out.
- Always Cut On A Mat: Whenever you’re using a rotary cutter, you should always be cutting on a rotary mat. Rotary mats are large, flat, and usually plastic, and they provide a smooth workspace to cut on. It’s important to use a rotary mat because regular tables often have knicks or holes, which can cause your rotary cutter to jerk and can lead to injury. We’ll discuss types of rotary mats in the materials section later on.
- Cut Away From The Body: When using your rotary cutter, always cut away from yourself instead of towards your body. This way, if you slip, the blade isn’t headed towards you.
- Cut Standing Up: It’s tempting to cut while sitting in a relaxed position, but you won’t have as much control over your blade. When you use your rotary cutter in a standing position, you have more control and reach.
- Be Consistent With Brands: Don’t be tempted to put a spare blade on a rotary cutter from a different brand. While two different brands may seem compatible, slight inconsistencies can lead to the blade popping off and result in injury.
Materials
Now that you’re well versed in safe rotary cutter practices, let’s get into the materials you’ll need to begin cutting.
- Rotary Cutter: Obviously, you’ll need a rotary cutter! Invest in a solid, well-made cutter that will last you a long time. A 45 mm rotary cutter will work well for most projects.
- Spare Blades: Many rotary cutters will come with a few replacement blades. It’s always a good idea to have some spare sharp blades on hand, in case your cutter dulls.
- Rotary Mat: There are a variety of different rotary mats on the market. The most common types are plastic and self-healing. Plastic mats are okay, but we recommend investing in a self-healing mat. Self-healing mats are made from a special material that actually mends itself after it’s cut. This ensures your mat stays pristine, and you won’t risk your blade jumping and injuring you.
- Ruler: To cut straight lines, you’ll need a ruler. Rulers also provide a barrier between your fingers and the blade of the cutter. A long plastic ruler, or a square quilting ruler, both work well.
- Fabric: Lastly, you’ll need some fabric to cut. Make sure that the thickness of your fabric is compatible with the size of rotary cutter you have. Thicker, heavier fabrics will require a larger cutter.
How To Use A Rotary Cutter
Once you’ve gathered your materials, you’re ready to begin cutting! First, lay out your rotary mat on a large, flat surface. Ensure that your room is well-lit and you have ample room to work. Lay out all your materials for easy access.
Next, you’ll square up your fabric. Store-bought fabric usually doesn’t come with completely straight edges, so it’s important to square up the fabric. This ensures that all your pieces will be straight and perfectly even. Once your fabric is squared up, it will be at a perfect 90-degree angle to the fold.
To square up your fabric, fold it along its length, selvages together. If the fabric has previously been folded incorrectly, press it with an iron, so it’s perfectly flat. Place your fabric on the cutting mat, with the fold near the bottom edge and the side to be squared up on the left. Line up the fold with one of the horizontal lines on your cutting mat or one of the horizontal lines on a square rotary ruler.
Take either a square ruler or a long ruler and place it down near the left edge of the fabric. Ensure that the ruler is at a perfect 90-degree angle with the fold. Now, you’re ready to cut. Remove the safety from the rotary cutter, and place your fingers on the ruler, away from the blade’s path. Cut carefully, applying even pressure throughout.
Once the edge is squared up, you’re ready to start cutting any strips and squares your project may require! You’ll use the same process you used when squaring up the edge. Measure carefully, and ensure you’re always cutting perpendicular to the fold for perfectly straight lines.
Conclusion
Rotary cutters are an amazing tool. But they can be dangerous, so make sure you’re always following our safety tips. With a little practice, you’ll be able to cut precise, professional fabric sections in seconds!
For more sewing tutorials and high-quality equipment, visit Love Sew online here. We’re passionate about all things sewing, and we’d love to welcome you into our community.
Sources:
Working Safely with Sharp Blades or Edges | OSH Answers
Household Safety: Preventing Cuts (for Parents) | Nemours KidsHealth
1 comment
cristina vee
Thanks for sharing! Using Rotary slitter cutters can be tricky, but your guide makes it much clearer. Understanding the proper technique is crucial for safety and efficiency. Looking forward to applying these tips in my own projects. Great job breaking it down!
Leave a comment
This site is protected by hCaptcha and the hCaptcha Privacy Policy and Terms of Service apply.