Did you know that after you make a quilt block, you’re supposed to check it with a ruler to make sure it is the correct size? If it’s not, you need to trim the block, or make other adjustments, so that your finished quilt will look right. This is called, “squaring up your blocks.” It’s a tedious task, but so worth it!
We’ve talked about the importance of sewing consistent ¼” seams on the blog before, but even if you’re super careful, some of your blocks might still get messed up. That’s why the ‘squaring up’ task is something you should never skip. We’re going to show you how to do it in this post.
Getting Started…
Before you attempt to square up your blocks, you need to press them well. We recommend using a wool pressing mat for the flattest blocks possible. Be careful not to stretch your blocks out of shape with your iron — simply apply pressure to the seam. A quilter’s clapper can also help.
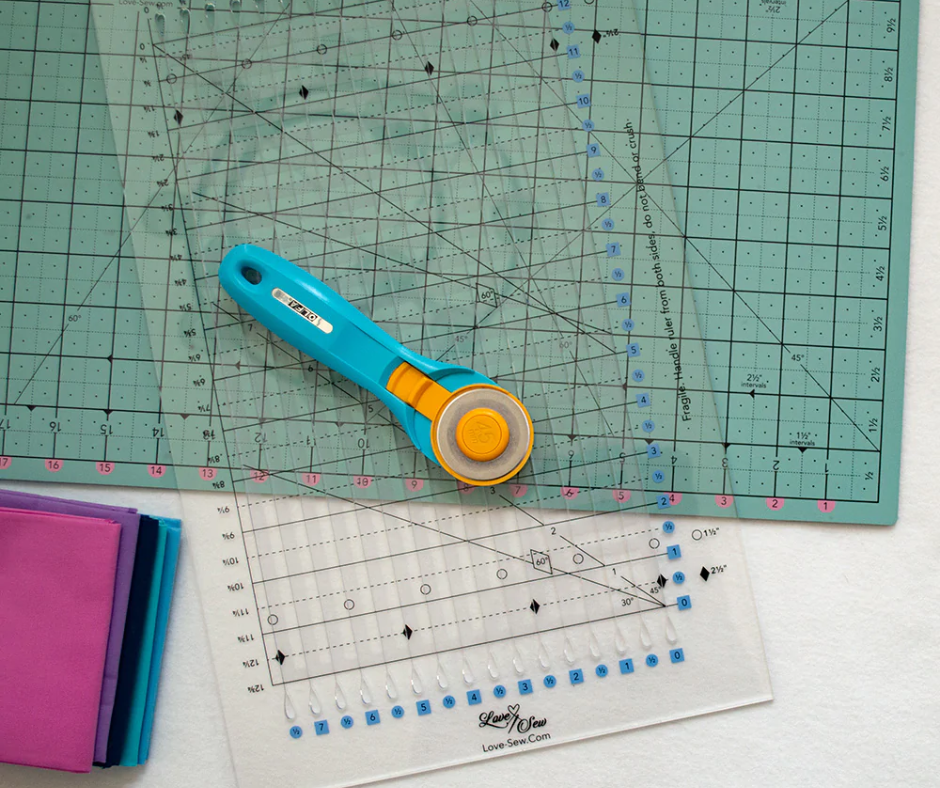
To square up your blocks, you’ll need a rotary cutter, cutting mat, and an acrylic ruler. A square acrylic ruler that is the same size as your finished quilt block is helpful, but you can use any ruler with a 45° angle. If your blocks are too small, you’ll also need some freezer paper.
Note: If you don’t have any quilting rulers yet, we suggest you start your collection with a standard 8”x12.5” ruler. It can be used for squaring up your blocks, cutting strips, and measuring all sorts of angles.
How to Square Up a Quilt Block That Is Too Big
It’s more common for quilt blocks to turn out too big than too small. If this is the case for you, take a ruler and center it on top of your block. Then, carefully trim all the way around to make the block the perfect size. A square ruler makes this process fast and easy. If you have a larger ruler, you can trim two of the sides of your block and then turn your block around and trim the other two sides.
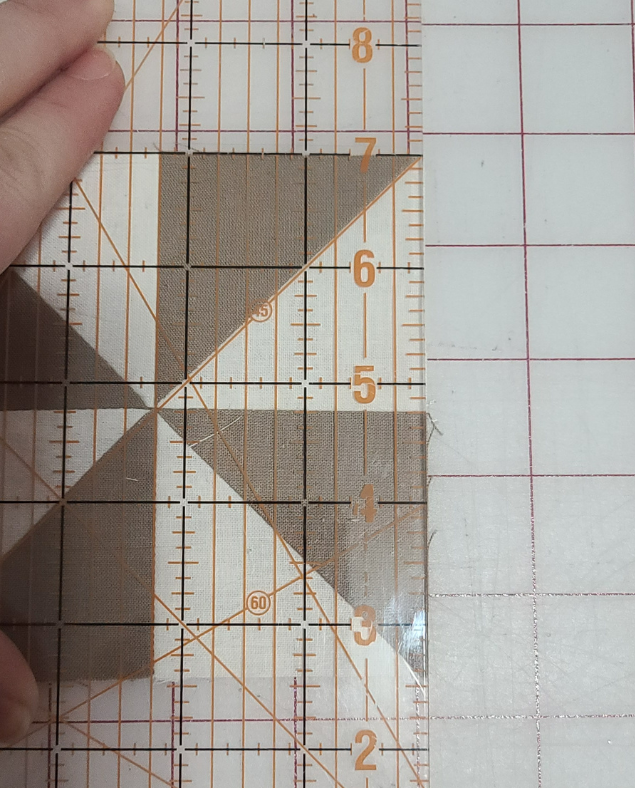
If you’re squaring up a half-square triangle block, place the 45° angle mark on your ruler directly on the seam where the two colors match up and then trim all the sides. This helps prevent you from chopping off the tips of your triangles. We love using a rotating cutting mat for this task.

How to Square Up a Quilt Block That Is Too Small
If you’ve been a little too generous with your ¼” seam allowance, your blocks might turn out too small. That’s why quilt patterns frequently recommend that you use a scant ¼” — it prevents them from being too small. However, all is not lost if they’re only a little bit small. You can use some freezer paper to square up your blocks.
Cut a piece of freezer paper to the size that your quilt block should be. Then, draw lines ¼” from all the edges. This will show where your seam allowance is supposed to be. Also draw a horizontal line, vertical line, and two diagonal lines across your freezer paper to mark the center of your block. This will help with positioning later.

Place the freezer paper on top of your block with the shiny side down, making sure it is centered. If the edges of your block fall within your ¼” border lines, this method is going to work for you! Iron the freezer paper in place. Repeat this process for any block that is measuring too small.
With the freezer paper still attached, sew all your blocks together. You’ll be using the freezer paper as your new straight edge. Once all your blocks are sewn together, you can carefully rip off the freezer paper.
That’s all there is to it! If you take the time to square up your blocks, your quilts really will turn out better. Don’t you agree? Now, get yourself a NEW Quilt Kit and start practicing!
20 comments
Ruby Deadder
Being a beginner i have made mistakes and I know why thank you for this information very helpful
Vicki Hetrick
Thank you, I really needed that tip!
Barbara Zavalney
Very helpful. Am self taught and any hints and directions helpful.
Brenda
Good information
Judy
been quilting for 40-some years, self-taught and this was very good information, if my blocks were off I just cut some new ones or just trim them when I sewed the quilt together, thank you for the information
Leave a comment
This site is protected by hCaptcha and the hCaptcha Privacy Policy and Terms of Service apply.